
Blogging in Nigeria has kind of turned into a more popular way people try to earn money. If you’ve got something useful to say , and you are ready to drop it where the world can see, you may end up making a decent income from it. But yes , just creating a blog and calling it done won’t automatically bring results.
You still have to handle a few things, if you want that blog to actually behave like a real business. Because starting is one part, sustaining and growing is another part.
In this post, we are going to look at practical tips on how to start a blog business that earns money in Nigeria. We’ll talk about picking a niche, making sure your content is well written, and also how to push or promote your blog so people can find it.
If you follow these steps, you should be closer to building a steady blogging setup that can truly make money in Nigeria.
What Is Blogging
If you’ve ever heard the term “blog” and didn’t know what it meant, you’re not alone. A lot of people have heard the term but don’t really know what a blog is or why people blog. In this article, we’ll answer those questions and more.
Blogging is a way to share your thoughts, experiences, and insights with the world. A blog is a personal website or web page where you can write about anything you want.
You can use a blog to share your opinions on current events, to write about your hobbies, or to just chronicle your day-to-day life. A blog is a great way to express yourself and to connect with others who share your interests.
There are no rules when it comes to blogging, so you can tailor your blog to your own personality and style. Whether you want to blog for fun or to build a following, there’s no wrong way to do it.
Blogging in Nigeria is a bit different than blogging in other countries. For one, the blogging community is much smaller. This means that there aren’t as many opportunities to network and collaborate with other bloggers.
Additionally, the majority of Nigeria’s population is rural, so most bloggers are writing for an urban audience.
That said, blogging in Nigeria can be a great way to connect with other Nigerians and to share your stories with the world.
There are numerous ways to monetize a blog. The most common way is through ads. sponsors will pay you to put their ads on your blog.
This is usually done through a program like Google Adsense.
Another way to make money with a blog is through sponsorships. companies will pay handsomely for your positive words about their products or services.
And finally, you can also make money through affiliate marketing. All these will be discussed in detail later in this post.
If you’re thinking about starting a blog, here are a few things you should do.
How To Start A Blog In Nigeria
- Pick A Niche For Your Blog
If you want to start a blog, one of the first things you need to do is figure out what you’re going to write about. This can be a daunting task, especially if you don’t feel like you have any special talents or know anything that nobody else does.
The good news is, you don’t need to be an expert on something to start a blog about it. You just need to be interested in it and be willing to share your thoughts and experiences with others.
There are a lot of people out there who are interested in the same things you are, and they’re looking for someone to give them information and advice on those topics.
So if you’re stuck on what to write about, just think about what you’re passionate about or what you’re curious about.
Chances are, there are other people out there who feel the same way as you do, so they would probably love reading your new blog posts and learning more about your interests.
If you’re not sure how to pick a niche, don’t worry – we’re here to help. We’ll give you some tips on how to choose a niche for your blog. We’ll also provide some examples of popular niches to give you some ideas.
There are a number of factors to consider when choosing a niche for your blog. It’s important to choose a topic that you’re passionate about, but you also need to make sure there’s a market for it.
Why choosing a niche is important:
In business, it’s important to pick a niche. A niche is a defined market that you can target with your product or service. It’s important to pick a niche because it allows you to focus your marketing efforts and connect with a specific group of people who are most likely to use your product or service. Additionally, when you pick a niche, you can become an expert in that area and be known as the go-to source for that particular niche.
There are many reasons why it’s important to pick a niche, but these are just a few of the most important ones. Picking a niche will help you to focus your efforts, connect with your target market, and become known as an expert in your field.
If you’re having trouble deciding on a niche for your blog, here are a few tips to help you out:
– Do your research. Use Google AdWords and other tools to do research on your topic. Find out what people are searching for and see if there’s a demand for it.
– Know your audience. Who are you writing for? What are their interests? What are their needs? Knowing your audience will help you choose a niche that’s relevant to them.
– Be specific. The more specific your niche is, the easier it will be to stand out from the crowd. When you’re writing about a specific topic, you can become an expert on that topic and become a go-to resource when others need information on that topic.
-Check out some of the most popular niches in your industry. You might find that there are already lots of blogs that cover this niche, but still have potential as a good starting point for your own blog. If so, read through them and see if any catch your interest – maybe they’ve got some great images or interesting posts that could inspire you!
Here are 10 examples of popular niches to give you some ideas:
Technology
Business
Health and fitness
Lifestyle
Entertainment
Gaming
News and current affairs
Sports
Education
Travel
- Select A Name For Your Blog
Starting a blog can be overwhelming. You have so many ideas and not enough time (or money) to create content. And then you have to come up with a name that accurately represents your brand and speaks to your audience. No pressure or anything.
Your blog’s name is important because it will be how people identify your blog in the online world. If you’re stuck trying to come up with a name for your blog, don’t worry. We’ve got you covered with this list of tips on how to choose the perfect name for your blog.
So how do you choose the perfect name for your blog?
Here are a few tips:
– Keep it simple. A good blog name is easy to remember and pronounce.
-Your blog name should be the same as your domain name. Having a consistent name will make you look more professional and increase the chances that people will remember your blog.
– Make it unique. Your blog name should be different from any other out there. You can check for the availability of a name from your domain and web host provider.
– Keep it relevant. Your blog name should be reflective of your blog’s content and purpose.
– Avoid using hyphens or numbers. These can make your blog name difficult to remember and hard to type.
-Shoot for a short and easy to remember domain name. A shorter name is easier to spell and type than a long one. Plus, it makes it more likely that visitors will remember your website name. So, try to come up with a name that’s six to 14 characters long.
-Think long-term. Blogging is an investment for the future. So basing the name on a catchphrase that’s popular right now might not be the best idea in the long run. Consider where your business or brand might be in five or ten years before deciding to claim a domain name.
-It is best to avoid using doubled letters in your domain name as it can increase the likelihood of people misspelling the name and losing traffic as a result.
-Use a domain name generator to get some ideas (we recommend looka). You can enter a word or phrase that describes your project and it will give you a list of suggestions. Also, use other tools like Thesaurus to make sure you’re not using a word with the wrong meaning.
-Investigate social media networks. Once you have a good understanding of your domain name, search for it on well-known social media sites like Twitter, YouTube, Instagram, and Facebook. Claim a page for your project to stop others from taking the name.
-It is important to check the domain’s history to ensure that it was not associated with a fake website. The Wayback Machine is a useful tool for finding information about the background of a domain and seeing who its previous owners were.
– Brainstorm with friends. Sometimes it helps to get some input from others before settling on a name.
By following these tips, you’ll be well on your way to choosing a brand new blog identity that people will want to follow.
- Purchase A Domain Name And A Web Host
Before you can start blogging, you will need to purchase a domain name and a web host. A domain name is the URL of your blog (e.g. www.example.com) and a web host is a service that stores your blog’s files and makes them accessible to readers.
There are a lot of domain name and web hosting providers to choose from, so take your time to research your options. Once you have found a provider that you’re happy with, you can purchase your domain name and web hosting plan. We will talk about how to purchase a domain name and web host later in this chapter.
It’s important to make sure your domain name doesn’t infringe on any trademarks. If it does, you could be facing some serious legal consequences. Here’s how to do a quick trademark search to see if your domain name is available.
First, go to the USPTO website and search for registered trademarks. You can do this by clicking on the “Search” tab and then selecting ” trademarks.”
Next, enter your domain name into the search bar and hit enter.
If there are no results, that means your domain name is available. However, if there are results, that means there are already trademarked names similar to yours. You’ll need to choose a different domain name to avoid any legal issues.
You can also perform a public search on the Cooperate Affairs Commission (CAC) for localised business names that might be available or taken.
How to purchase a domain name and a web host service with Hostinger
Hostinger is one of the leading web hosting providers on the market. They offer a wide range of hosting services, from shared hosting to VPS and cloud hosting. They also have a variety of features that makes them a great choice for businesses of all sizes.
One of the most popular features of Hostinger is its 24/7 live chat support. This means that if you have any problems with your website, you can contact Hostinger’s support team at any time of day or night and they will be happy to help you.
In addition to its live chat support, Hostinger also offers a wide range of tutorials and FAQs to help its users get the most out of their web hosting service.
If you’re looking for a web host that offers great value for money, reliability, and performance, then Hostinger is definitely worth checking out.
We’ve put together a quick rundown of everything you need to know about Hostinger, from their features to their pricing, to purchasing a domain and setting up your WordPress blog.
Here are some of the reasons why we recommend using hostinger as a domain service provider:
-Hostinger is one of the world’s most well-known web hosting companies.
-They offer a variety of plans to accommodate different budgets and needs
– offering affordable prices for high quality services
– 24/7 multilingual customer support in over 20 languages
– Easy to manage hpanel
– Their uptime is very reliable and they offer a 99.9% uptime guarantee.
-One of the cheapest hosting services. With as little as $2.99 per month, you can start running a blog.
– Offers cloud hosting plan that is powered by Google Cloud
-Exceptionally fast servers for faster loading
-User-friendly control panel
– The latest PHP 7.4 live on all servers
– WordPress/Onboarding Flow optimised
– One Click Installer for WordPress
– Money-back guarantee for 30 days
– 2-Factor Authentication for additional security.
– A free domain and SSL certificate
-Over 29million users around 178 country
Getting Started With Hostinger
Follow our step-by-step tutorial below. We’ll try to make it as simple as possible to understand! To get started, head over to Hostinger.com
Perform A Domain Name Search
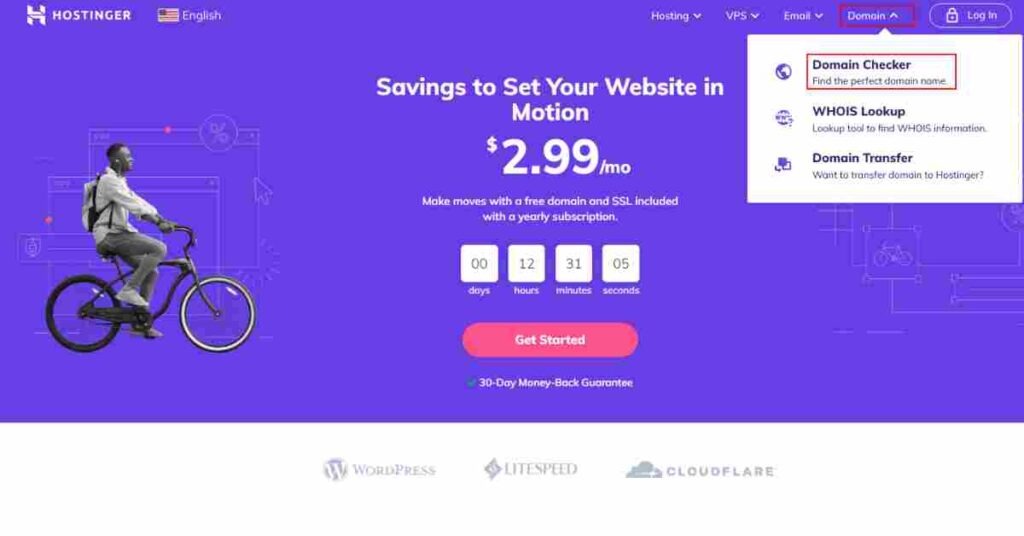
On the home page, click on the domain which can be found on the menu section at the top and select domain checker. This will take you to the domain checker page where you can search for your desired domain name.
Use the search bar in the domain checker to check whether the domain name you want is available, as well as to find alternative suggestions if your first choice is already taken.
To do so, simply enter the desired domain name into the search bar below and click “Search.”
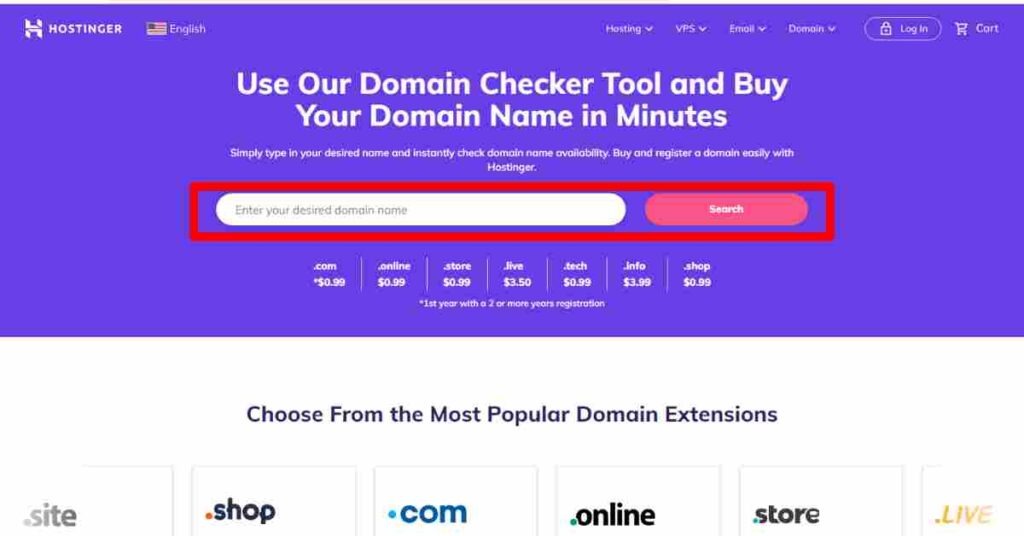
If the domain name you searched for is available you can then proceed to add to cart otherwise you can select from the suggestion listed below the search.
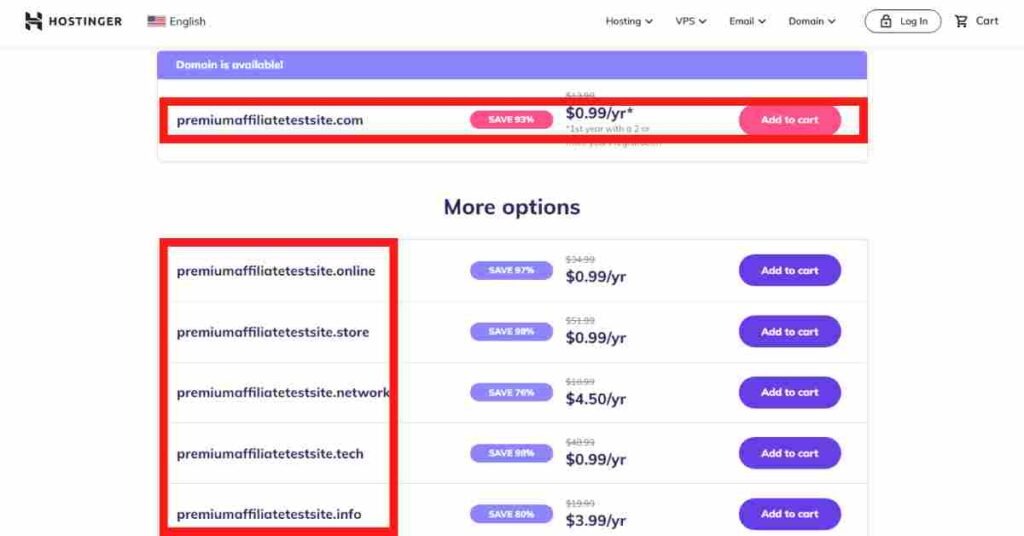
Domain name extensions are those things you see at the end of a website URL, like “.com” or “.org.” They’re formally referred to as top-level domains (TLDs).
The right domain extension sets your website apart and communicates what it’s all about to visitors. Be strategic when choosing your domain name extension—the WRONG one can be confusing and make your brand name susceptible to being misinterpreted.
There is no one-size-fits-all answer when it comes to choosing a domain extension. However, certain domain extensions are more suited for specific types of websites.
The domain extension you choose depends on the type of website you want to create. For instance, a .biz, .com, or .store domain is generally best for an eCommerce site.
If you’re looking to start a blog, on the other hand, a .me, .com or .online domain could be a great option. If you’re unsure about which domain extension to use, we suggest going with a .xyz or .icu domain. These are generic TLDs and are not associated with any particular niche or website type.
Pick Your Preferred Domain Name
After you have found the perfect domain name for your project, you can move forward with the checkout process.
Before choosing a domain registration period, it is important to research the different durations that registrars offer. Some registrars offer shorter durations, while others offer up to ten years. It is also important to note that registrars will send an alert before the initial registration period ends, so that you can renew it if necessary.
Additionally, domain registration companies usually necessitate users to pay for a minimum timeframe of one year. However, other registrars might have a longer minimum registration duration, for example two years. You can pick one year to start.
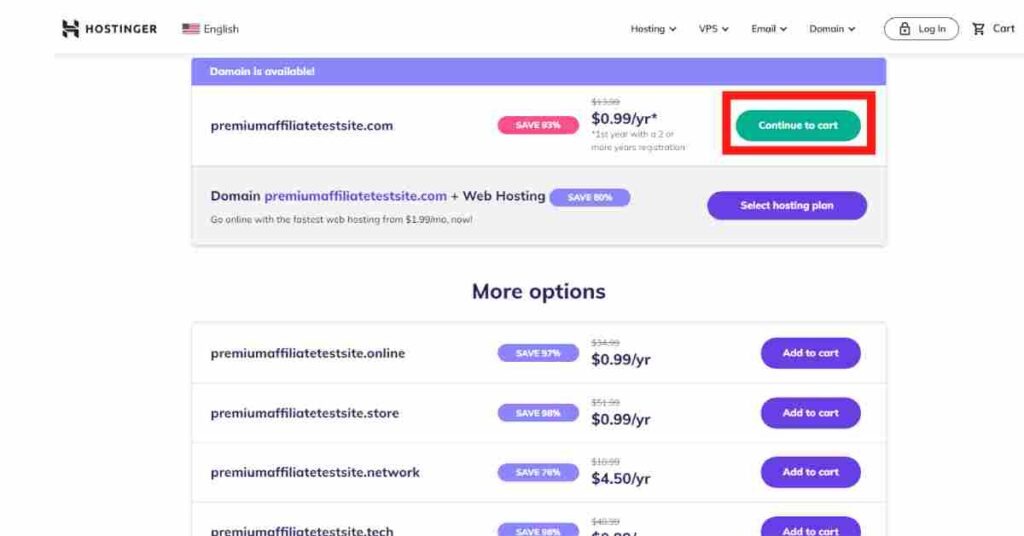
Purchasing a domain at Hostinger is a simple process! Start from the domain checker page and press the “Add to cart” button next to the domain. Then, click “Continue to cart.” Soon, you’ll be the proud owner of a new domain!
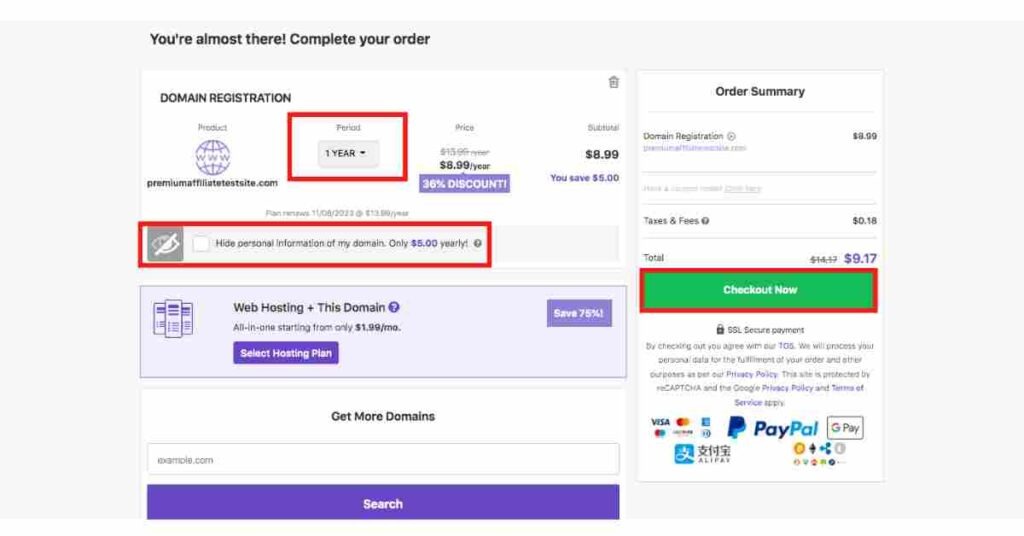
Select the registration period from the drop-down list in the shopping cart window. You can also choose to add the privacy protection add-on here. Click the Checkout Now button to finalize the order.
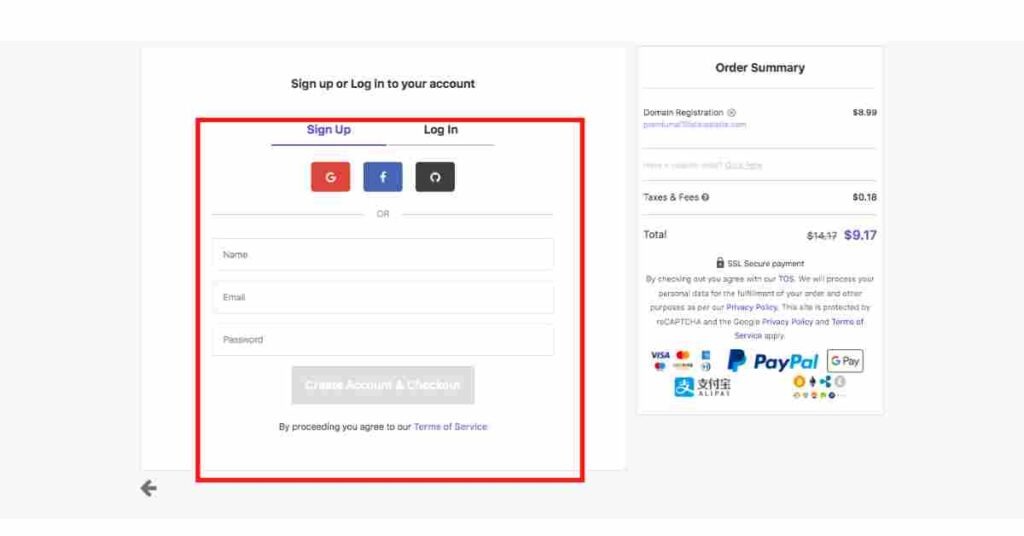
The next step is to log in or create an account to complete the ordering process.
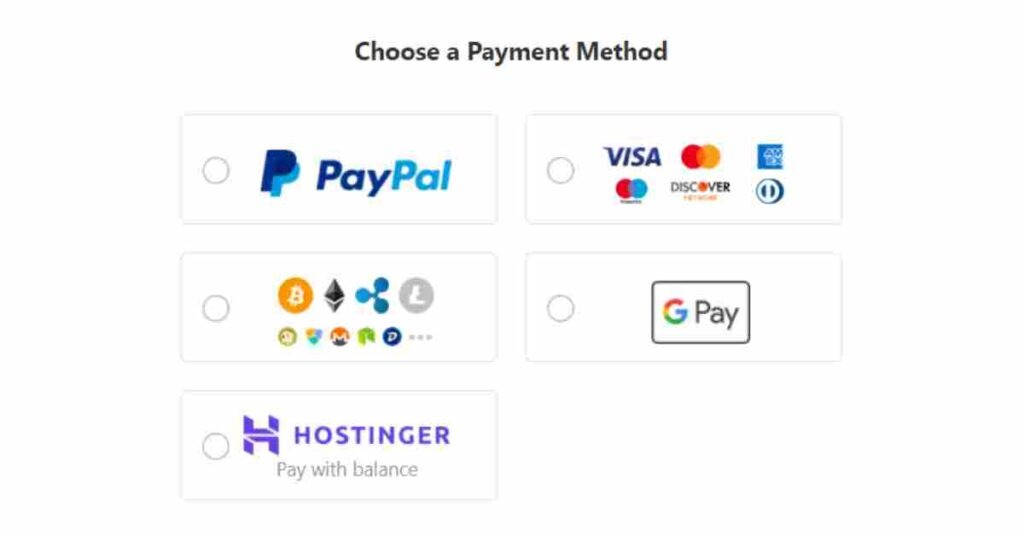
After taking care of that, continue the checkout process and choose a payment Method.
You’re nearly there! To complete the website domain purchase, enter your billing information and review the order.
Finishing Up The Registration Domain Process
You’ll be taken to the control panel after you finish the payment. Inside, there will be a box to fill out to finish the domain name registration.
Be sure to fill in all of the form fields with the correct information! This includes all the info they will need to contact you, like your name and address.This information will be entered into WHOIS, the global domain ownership database.
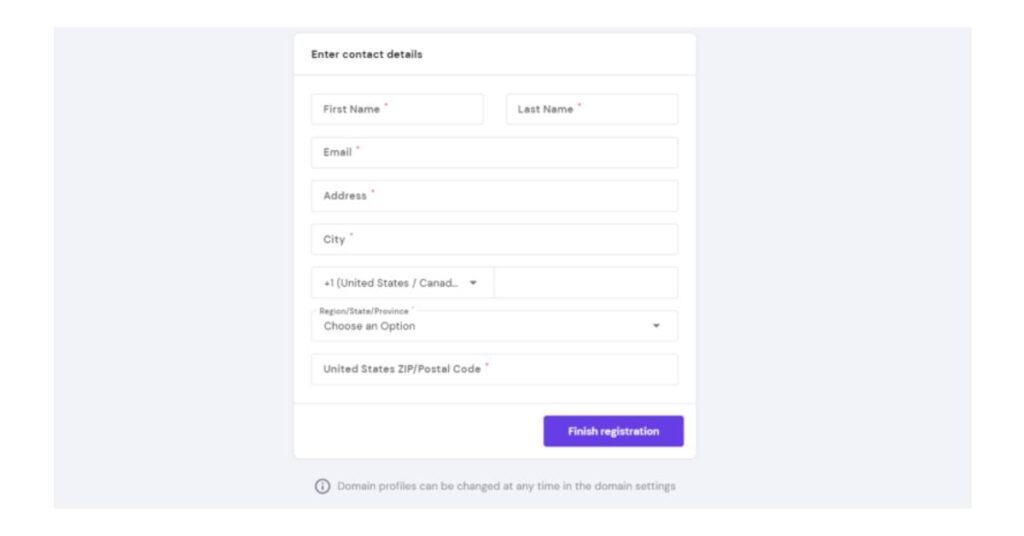
The domain registration will be processed when you enter your information and click on finish registration.
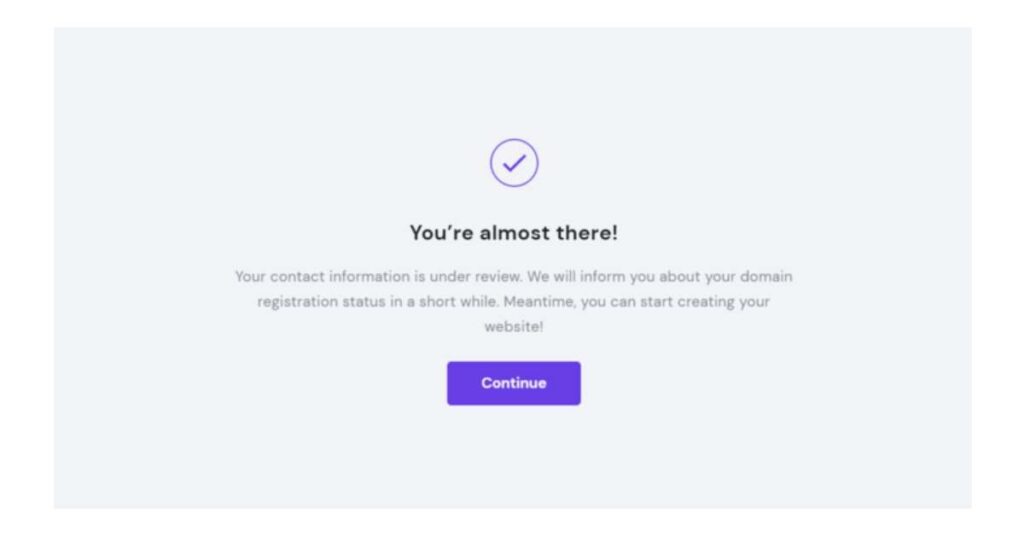
There’s just one last step to finalize your domain registration- confirming domain ownership using the email address you provided when you registered the name.
Once you complete the domain settings, the verification email will generally be sent to you within a few minutes. To verify your contact information, simply follow the verification link in the email.
Great job on taking the first step towards starting your blog by purchasing a domain name and web hosting account. The next step is to install WordPress onto your website so that you can begin blogging.
Purchasing a Domain from Someone Else
If the domain name you’re after is already taken, it might become available again. If you find a really great name, follow these steps to buy it:
Find The Domain Owners Contact Information
To find the owner of a domain, you can look up their contact information in the WHOIS directory. If the owner’s information isn’t listed there, you might be able to find it on the domain’s website.
Negotiate A Reasonable Price
Don’t ever wire money to a complete stranger over the internet – it’s a terrible idea. Use an escrow service instead to make sure that both parties are happy and that your transaction is as low-risk as possible.
Once you have your domain name and web hosting set up, you can install WordPress, which is a blogging platform that will make it easy for you to create and manage your blog.
Why Is WordPress Suggestion For Starting A Blog?
WordPress is an amazing platform for starting a blog. It’s easy to use and there are a lot of free themes and plugins available. Plus, it’s a very popular platform, so there’s a good chance your readers will already be familiar with it.
There are a few other platforms you could use to start your blog, but we think WordPress is the best option. Here’s why:
– It’s easy to use. You don’t need any technical expertise to create a WordPress blog. Anyone can do it.
– You can choose from a variety of free plugins and themes. This means you can customize your blog to look however you want without spending any money.
– WordPress is a very popular platform. This means your readers will likely already be familiar with it, which makes things easier for them.
Why we Don’t Recommend You Start A Blog On A Free Blogging Platform
If you’re thinking about starting a blog, you might be considering using a free blogging platform like WordPress.com or Blogger.com ( The free hosting service).
And while there are some benefits to using a free platform (like not having to pay for hosting), there are also some serious drawbacks that you should be aware of.
Free blogging platforms are often very limited in terms of features and customization, which can make it difficult to create a truly unique blog.
They also tend to have a lot of ads, which can distract and annoy your readers. And finally, most free platforms don’t offer any kind of support, which means you’re on your own if anything goes wrong.
Other drawbacks include: You don’t have full ownership, it’s more difficult to rank on search engines, and they can be pretty limited in capacity. Plus, a lot of them have pretty terrible URL structures making it even more difficult to make money with them.
For all these reasons, we don’t recommend starting a blog on a free platform. If you’re serious about blogging, it’s worth investing in your own self-hosted WordPress blog.
How To install WordPress On hostinger
Now that you have finished your domain registration at hostinger, Your domain is now available but not yet visible on the internet. You need to install WordPress to make it visible.
To begin, ensure you have your Hostinger’s hPanel opened and locate your hosting account. Use the username and password from your purchase, which can also be found in the confirmation email you should have received.
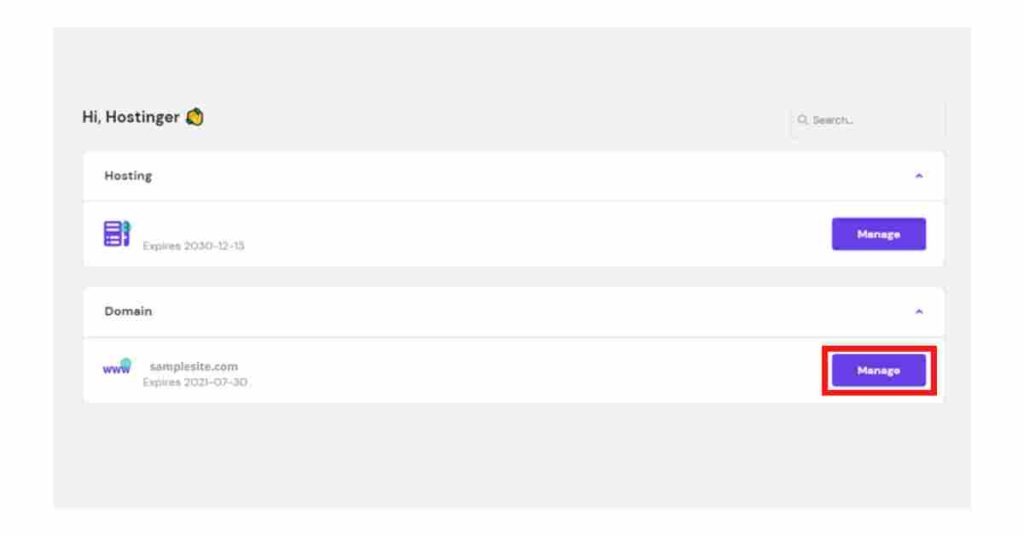
The hosting account that you have purchased will be displayed just like the image below.
In the next step, you will find the Manage button, where all the web hosting info and settings are. After you find it, click on it and you’ll be taken to the next stage.
You can find a list of all the options and settings that are important to manage your website. As you can see in the image below, there are different sections, for example, Orders, Accounts and Email Setting.
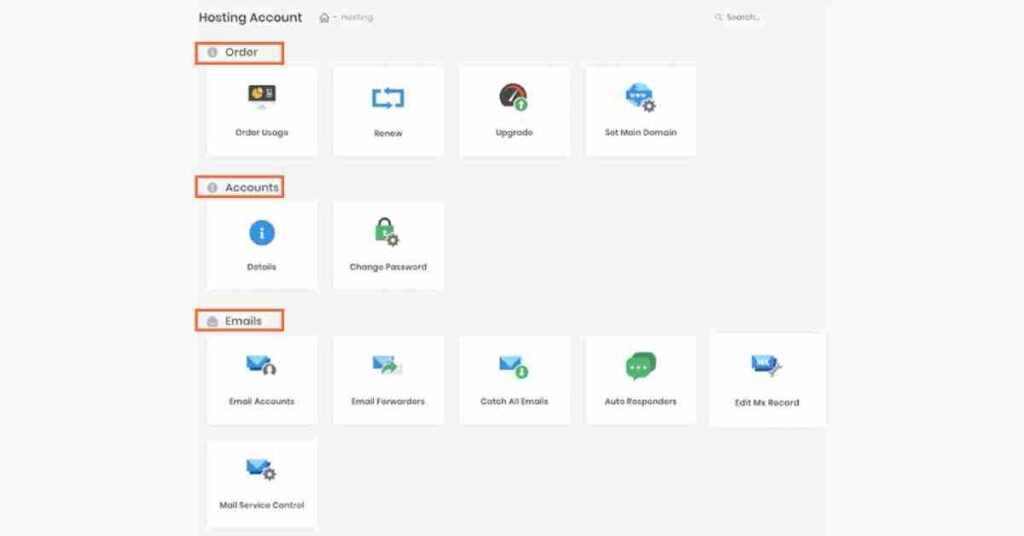
You need to find the Website section on your WordPress dashboard [check the image below].On the Auto Installer page, select WordPress and click the Select button.
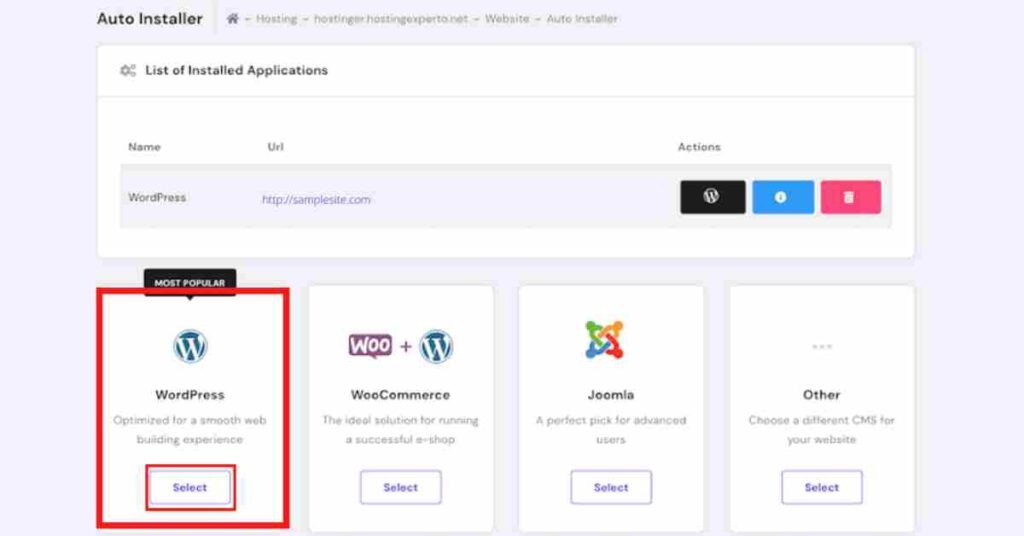
You will be taken to a page to fill out the WordPress Installation form:
– Check that your custom domain name includes the term “wordpress.”
– WordPress logins require the Administrator Username, Password, and Email. They don’t have to be the same as the login credentials for web hosting. Choose a strong password to avoid security breaches.
– you will also be required to make a title for your WordPress site.
– Select the language of preference for your WordPress site.
– To make sure you always have the latest version of the software, check the box that says “Always update to the latest available version.”
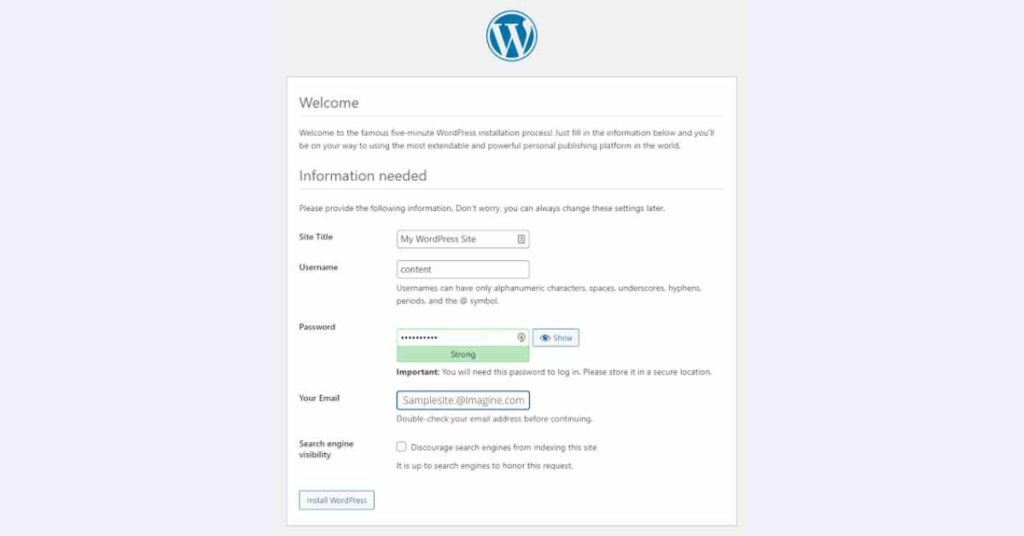
Once you finish filling out the necessary information, click on the Install button.
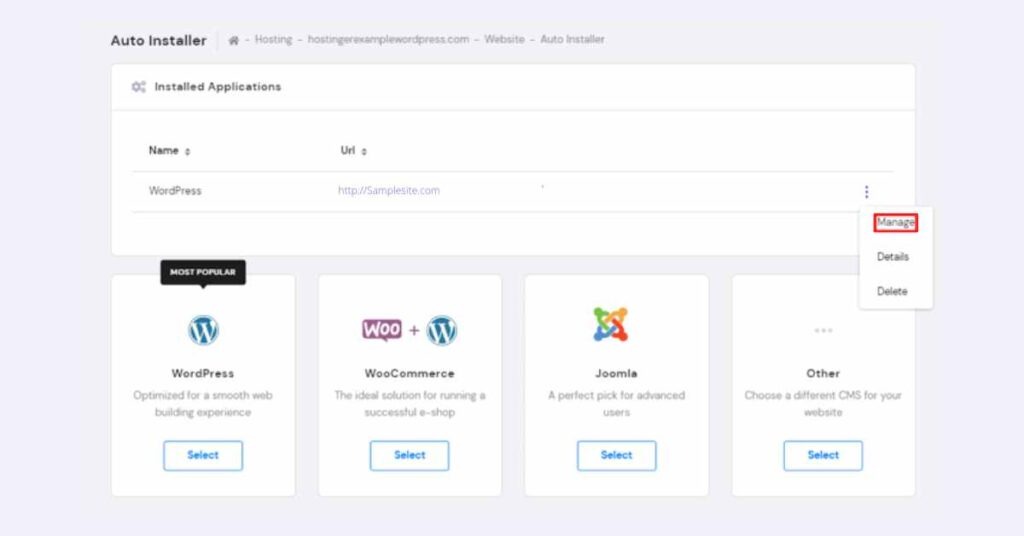
You can check out the apps you have installed on Hostinger by clicking the three dots close to your WordPress URL. To get to your WordPress Dashboard, just select Manage
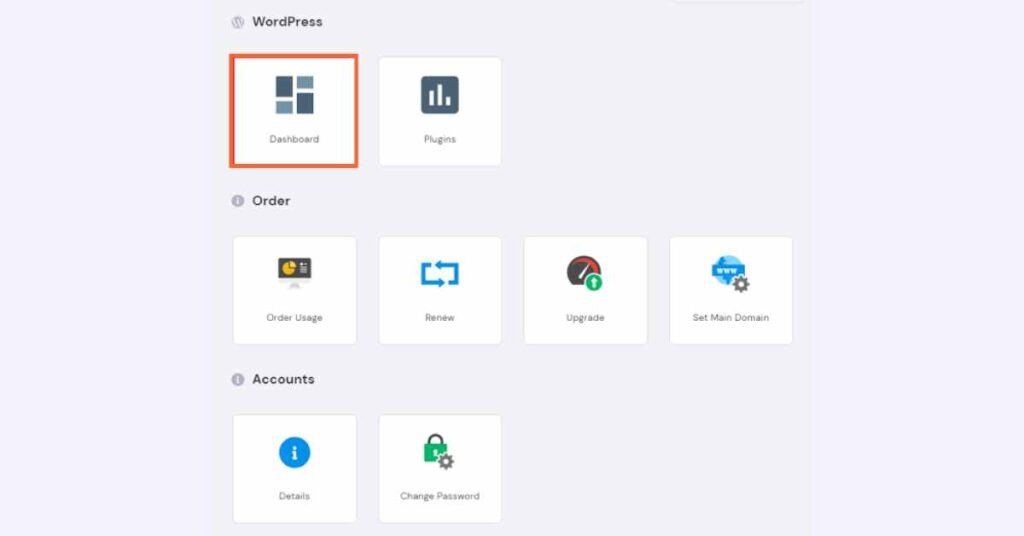
To access your WordPress blog, click on the dashboard button under WordPress on hPanel.
It’s important to clear your browser cache if you don’t see any changes on your WordPress site after following these steps.
Installing A Theme On WordPress
Now that you are familiar with the WordPress environment, the next step is to install a custom theme that suits your website’s visual design and aesthetics.
Choose a theme you like because it will provide all of the visual and design elements for your website. Even though WordPress includes a default theme, it’s best to install a custom theme that fits your blog’s branding better.
If you choose to install a free theme to begin with, here are some steps to guide you in doing so:
You can select from a variety of themes by clicking on Appearance from the side bar, or by hovering over Appearance. On the Themes page, click Add New to install a new WordPress theme. On the following screen, you can choose from Popular, Latest, or Favorites.
If you know the name of the theme you want, just type it into the search bar. If you’re not sure, you can use the “Feature Filter” to sort themes by things like subject, features, and layout.
Based on your search criteria, you will be listed with different themes within that category. Simply hover over the image of the theme you want to install when you see it. The ‘Install,’ ‘Preview,’ and ‘Details & Preview’ buttons will now be visible. We recommend Astra themes for a start.
Click the Install button when you’re ready. Activate a brand spankin’ new WordPress theme. Now WordPress will set up your theme. A success notification will appear on WordPress once your theme is ready to go.
To get you started, WordPress will present you two buttons, ‘Activate’ and ‘Live Preview’ buttons. To begin using this theme on your WordPress site, click the ‘Activate’ button. You have now installed and activated your WordPress theme.
When you visit your site, this updated theme will be used. Some themes require you to adjust additional parameters. For example, your theme may require that you install certain essential WordPress plugins to make it work smoothly, download some demo data, or adjust its settings.
You can make changes to your theme by using the WordPress theme customizer. To do this, go to the Appearance section on the side bar and click on Customize. Here you will see everything regarding your theme customization.
Installing Plugins on WordPress
There are lots of reasons why you might want to install a plugin on your WordPress website. Some plugins will add functionality to your site, while others will make it easier to manage or improve the look and feel of your website. No matter what you need a plugin for, there’s almost always an easy way to do it with WordPress.
There are two ways to install a plugin or theme on WordPress, you can install them manually or find them in the theme or plugin store on your WordPress.
Here are steps to help you install your first plugin on WordPress using the store:
From the WordPress sidebar, select Plugins > Add new to install a plugin.
Use the search box in the upper right corner to search for plugins.
A list of plugins will appear. Click Install Now after finding the plugin you want.
You can also click on ‘More Details’ which is below ‘Install’ to get more information about how to use and configure the plugin.
After it’s been installed (which usually just takes a few seconds). Next, you need to activate the plugin. This can be done simply by clicking on “Activate” to turn it on.
Congratulations! You have just learnt how to install and activate a plugin.
Every WordPress website should have these plugins
Super Cache: If you’re looking for a way to speed up your WordPress site, the Super Cache plugin is a great option. This plugin caches your pages and posts as static files, which means they load faster for your visitors. The plugin is free and easy to use, and it can really improve the performance of your WordPress site.
Anti-Spam Bee: If you’re running a WordPress site, one of the best ways to protect yourself from spam is to install the Anti-Spam Bee plugin. This plugin will help you keep your site clean by blocking spam comments and trackbacks. It’s a free plugin that is easy to install and set up, and it will quickly start protecting your site from spam. There are a few other spam-blocking plugins out there, but Anti-Spam Bee is one of the best. It’s constantly being updated to new versions, so you can be sure that it will always be effective against the latest spam techniques. If you’re looking for a good WordPress spam plugin, Anti-Spam Bee is a great choice.
Yoast SEO: If you want to make sure your WordPress site is optimized for search engines, then you need to use the Yoast SEO plugin. This plugin is a must-have for any WordPress site, as it helps you to optimize your site for both on-page and off-page SEO. Yoast SEO is a plugin that is constantly updated with the latest SEO practices, so you can be sure that your site is always optimized for the latest search engine algorithms. The Yoast SEO plugin is free to use, but there is also a premium version available. The premium version includes additional features, such as the ability to optimize multiple keywords, create redirects, and get real-time feedback on your SEO.
Google XML Sitemaps: This plugin is super easy to use and it automatically generates an XML sitemap for your site, making it easier for search engines to find and index your content. Plus, it’s free and it’s regularly updated to keep up with the latest WordPress changes. This plugin isn’t limited to Google alone, it also works with other search engines likeBing, Yahoo and Ask.com
Google Analytics WordPress Plugin: This plugin helps you to collect information about how visitors interact with your site, you can gain valuable insights into what drives their behavior. For instance, you may be able to identify the most popular pages on your site and identify areas for improvement. This can help you improve your conversion rates and drive traffic to your site.
Social Sharing Plugins: Adding social sharing buttons to your WordPress site is a great way to encourage your visitors to share your content with their friends and followers. This can help you boost traffic and engagement, and it can also lead to new leads and customers.
Page Builder: With a page builder plugin, you can create custom pages on your website without having to know any code. These plugins are easy to use and come with a variety of features that allow you to create pages that look great and function perfectly. Some of the popular once includes Elementor, Divi and Beaver.
There are thousands of plugins available for WordPress. These are just a few examples.
It’s important for websites to load rapidly, so keep the number of plugins you install to a minimum. A website that uses too many plugins may slow down. A whopping 40% of online visitors would abandon a website that takes more than three seconds to load, so it’s important to keep your website snappy and speedy.
Other Tasks to Complete Before Launch
You’re all done with the set-up for your website! You installed WordPress on your web hosting account and chose a theme. You also added some basic plugins to make your website more functional.
You have already submitted your website to Bing and Google, and set up Google Analytics to measure how many people have visited it. Now it’s time to begin populating some of the fundamental contents of your website and finishing a few more things before launching it:
Customize your blog URL for Search Engine: A lot of people don’t realize that they can customize their blog URL to help their blog show up higher in search engine results. By including keywords in your URL, you can make your blog more visible to people who are searching for topics related to your blog. Search engines use your page’s URL, heading, anchor text, and text to determine what your content is about.
Bad URL example
category=catcare/redirect
This URL is too long, confusing and difficult for search engines to understand what a page or a post is about.
Good URL example
Because this URL is short and sweet, Google and other search engines can quickly figure out what a page is about.
To make your website URL friendly for search engines, simply go to the settings in the sidebar of your WordPress dashboard and click on Permalink and switch the URL style to post name.
Once you have everything set up, you should then focus on making your blog content SEO optimized. People seeking for your content will be able to find it in Google search results every time you publish an article. Google and other other search engines will also understand what your content is about and help you suggest them to the right people.
Build Your Home Page: This is the page that people will see when they first visit your blog, so it’s important to make a good impression.
Your blog home page should give readers a quick snapshot of what your blog is all about. You can do this by including a brief description of your blog, along with some of your most popular or recent posts. You might also want to include a photo of yourself or your blog’s logo.
Once you’ve got your blog home page set up, be sure to link to it from your blog’s navigation bar. This will make it easy for visitors to find your home page and start exploring your blog. You can use the page builder you installed to help build all pages on your blog. They are easy to use since they are just drag and drop and require no coding.
Build Navigation Menu: Your website’s navigation menu is one of the most important elements on your site. It’s how your visitors will find the information they’re looking for, and it’s also a key factor in how search engines index your site. That’s why it’s important to build a navigation menu that is both user-friendly and search engine friendly.
There are a few things to keep in mind when you’re building your navigation menu. First, make sure all of your important pages are reachable from the menu. You don’t want to make it too difficult for visitors to find the information they’re looking for. Second, keep your menu concise. Overwhelming visitors with too many options is not a good idea. And finally, make sure your menu is easy to use on all devices. As mobile devices have become more popular, they are now being used to access the internet more and more.
Create An About Page: An “About” page is an essential part of any website. It’s a chance to introduce yourself, your business, or your project to your visitors. And it’s a great way to build credibility and trust.
There are a few key things you’ll want to include on your about page. You should begin by introducing yourself and your business. Next, you’ll want to explain what you do and why you do it. Finally, you’ll want to tell your readers what they can expect from your website or blog.
Create Your Contact Page: Your contact page is how potential customers and clients get in touch with you. So you want to make sure it’s easy to find and easy to use.
Here are a few tips on how to create an effective contact page:
– Create a headline that clearly describes what visitors will find on the page.
– Use a contact form to collect information from visitors. Be sure to include fields for Name, Email, and Message.
– Use a Google Map to show visitors where you are located (optional).
– Include a call-to-action on your contact page, such as “Submit” or “Send Message.”
Create your privacy policy page: Most websites have a privacy policy page that outlines what kind of personal information is collected and how it is used. If you’re planning on collecting any kind of personal information from your website visitors, you’ll need to create a privacy policy page.
Creating a privacy policy is easy and only takes a few minutes. You can use a service like iubenda to create your privacy policy page for free. Just enter your website name and address, and iubenda will generate a privacy policy for you. You can then add this page to your website.
If you’re not sure what to include in your privacy policy page, take a look at some other websites’ privacy policy pages for inspiration.
Create Your Disclaimer Page: It’s where you let your visitors know that you’re not responsible for anything that might happen to them while they’re on your site. You might also include information about your privacy policy, terms and conditions, and other important legal stuff.
Creating a disclaimer page is easy: all you need to do is create a new page on your site and include your disclaimer text. Once you’ve done that, you can link to your disclaimer page from your site’s header or footer. And that’s it! Now you can rest assured that you’ve got your bases covered in case anything goes wrong.
How To Create Your First Blog Post
WordPress released Gutenberg, a new, modern block-based editor, in December 2018. While it may appear clean and straightforward, don’t be fooled – there are tons of powerful features hidden behind its simple UI. We’ll go through each one and help you unlock its full potential.
#STEP 1: START BY ADDING NEW POST
To create your first post, log into your WordPress account and select ‘POST’ >> ‘ADD NEW’ from the dashboard. You should see something like this…
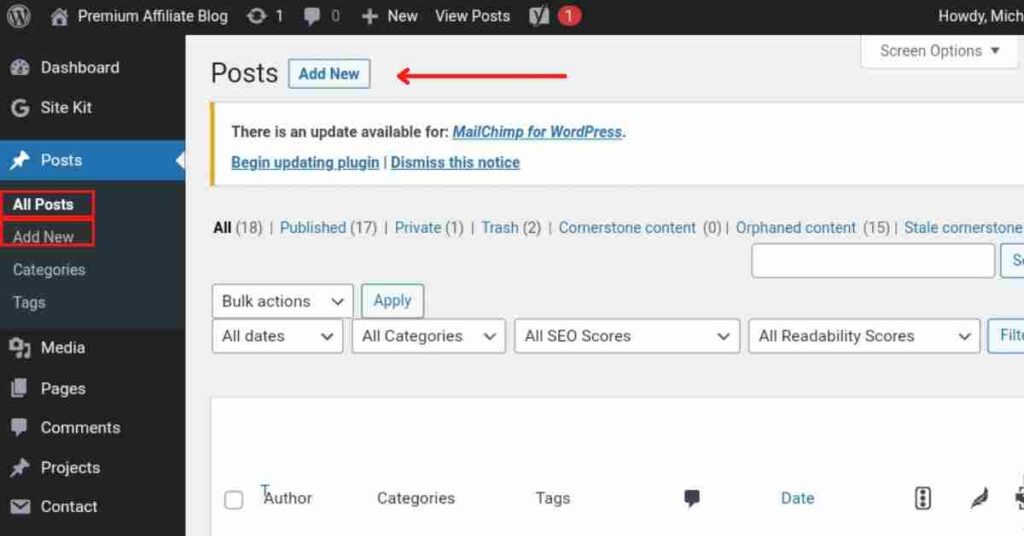
(Note: You must first switch to the block editor if the traditional editor is your default editor. Look for DEFAULT EDITOR FOR CURRENT USER on the right-hand menu and select SWITCH TO BLOCK EDITOR).
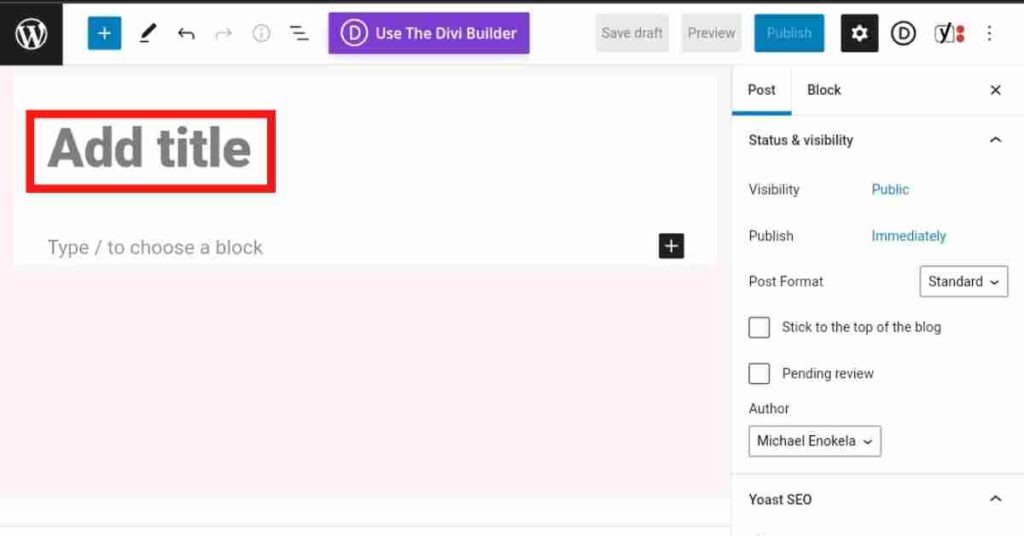
#STEP 2: NAME YOUR POST WITH A TITLE
You can give your post a title by simply adding your post title to the top where it says ‘ADD TITLE’.
#STEP 3: ADDING YOUR POST TEXT
You can add your blog text by just writing where it says TYPE / TO CHOOSE A BLOCK. When you use the return key to start a new paragraph, a new block is immediately created.
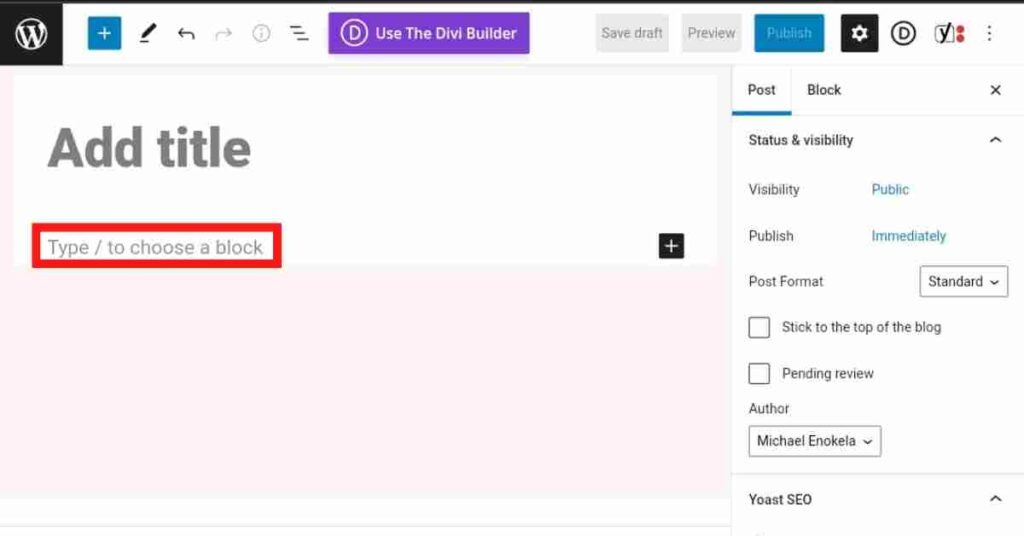
You can also just copy and paste from a Word or Google doc into the WordPress block editor. If you go this route, a new block will be automatically generated for each paragraph.
# STEP 4: ADDING A HEADING
Simply input your header text, then pick the paragraph symbol which is represented by the symbol: ¶ in the upper left of the popup toolbar. This will allow you to transform the text from paragraph to header text. Choose HEADING.
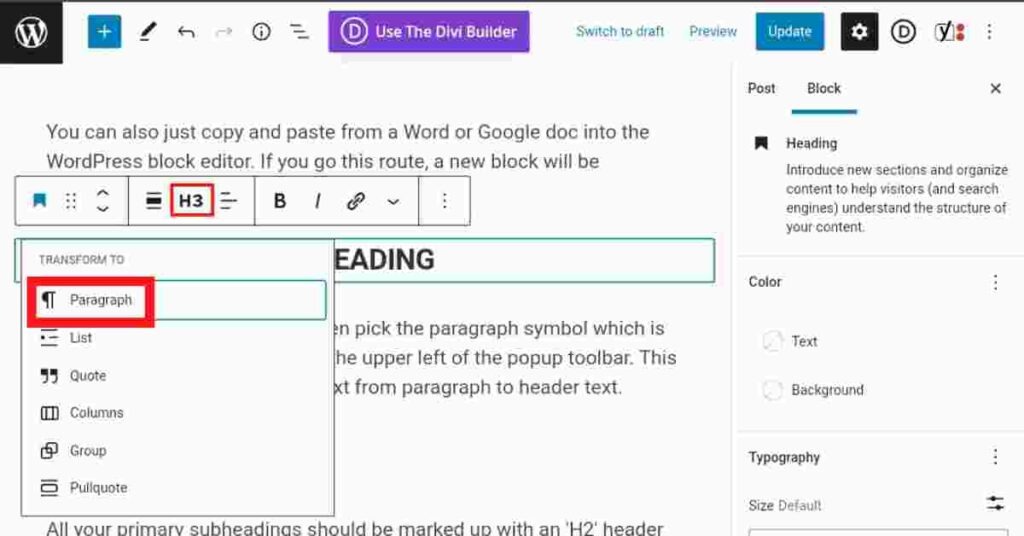
All your primary subheadings should be marked up with an ‘H2’ header tag. When dividing a paragraph into subsections with sub-sub-sub-headings, use ‘H3’ tags (and ‘H4’ for sub-sub-sub-sub-headings!).
You can also change the colors of your headings by clicking on your heading and selecting COLOR SETTINGS from the right-hand menu.
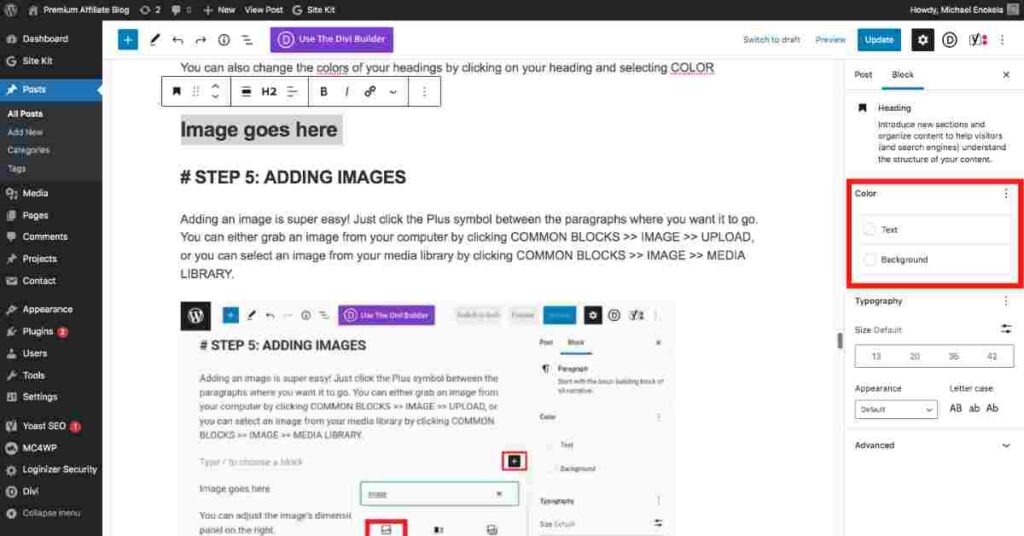
# STEP 5: ADDING IMAGES
Adding an image is super easy! Just click the Plus symbol between the paragraphs where you want it to go. You can either grab an image from your computer by clicking COMMON BLOCKS >> IMAGE >> UPLOAD, or you can select an image from your media library by clicking COMMON BLOCKS >> IMAGE >> MEDIA LIBRARY.
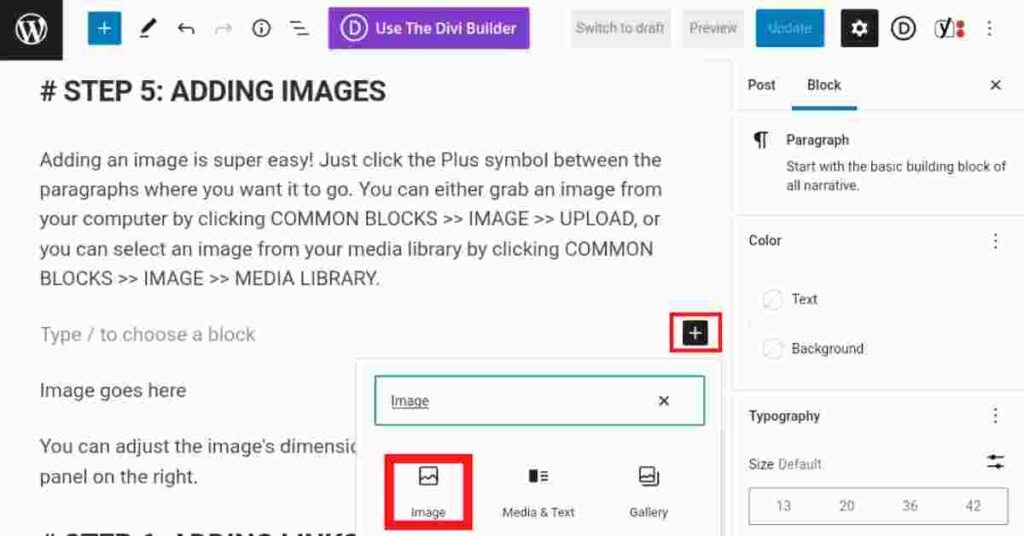
You can adjust the image’s dimensions and add an alt text using the panel on the right.
# STEP 6: ADDING LINKS
You can link to another post or page on your own blog by selecting the chain link icon from the popup toolbar and pasting in the URL or by writing a few words from the post’s title and selecting the appropriate post or page from the search results. You can also link to another post by highlighting the text to which you wish to link and then selecting the chain link icon from the popup toolbar.
The OPEN IN NEW TAB option can be turned on to open the link in a new tab.
It is important to ensure that a link is configured to open in a new tab before clicking the three dots in the pop-up toolbar and choosing EDIT AS HTML to make it nofollow.
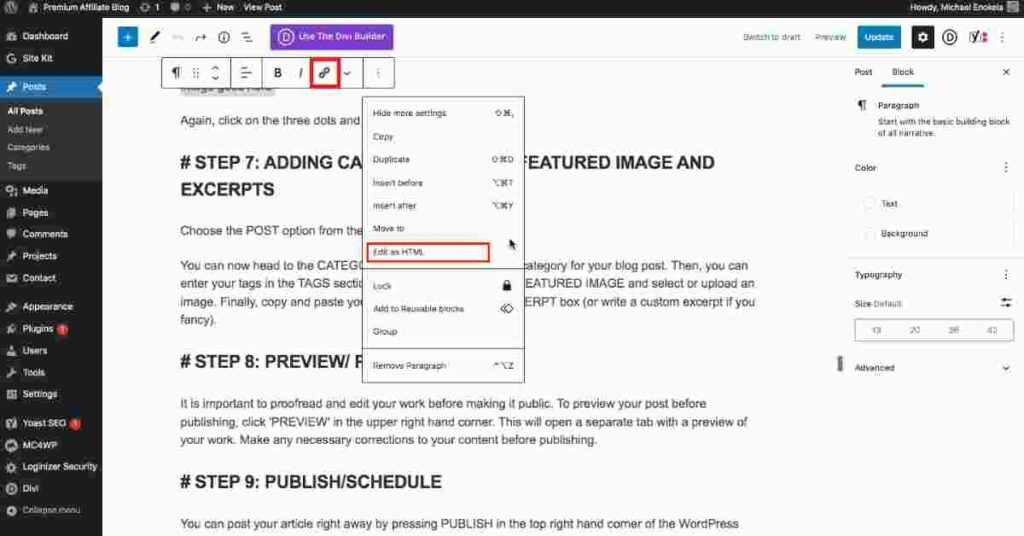
Search for the HTML code section that says rel=”noreferrer noopener” and replace it with rel=”nofollow noopener.”
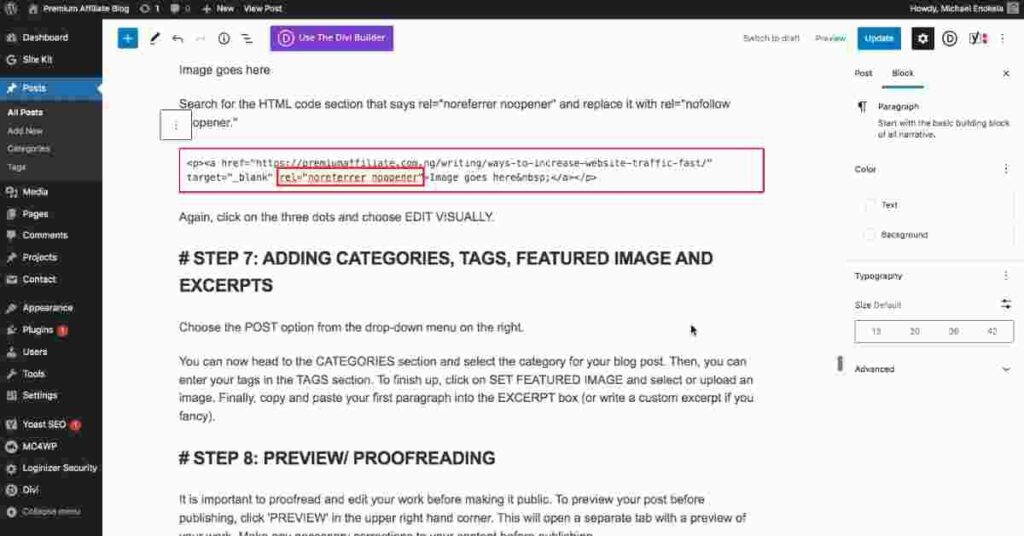
Again, click on the three dots and choose EDIT VISUALLY.
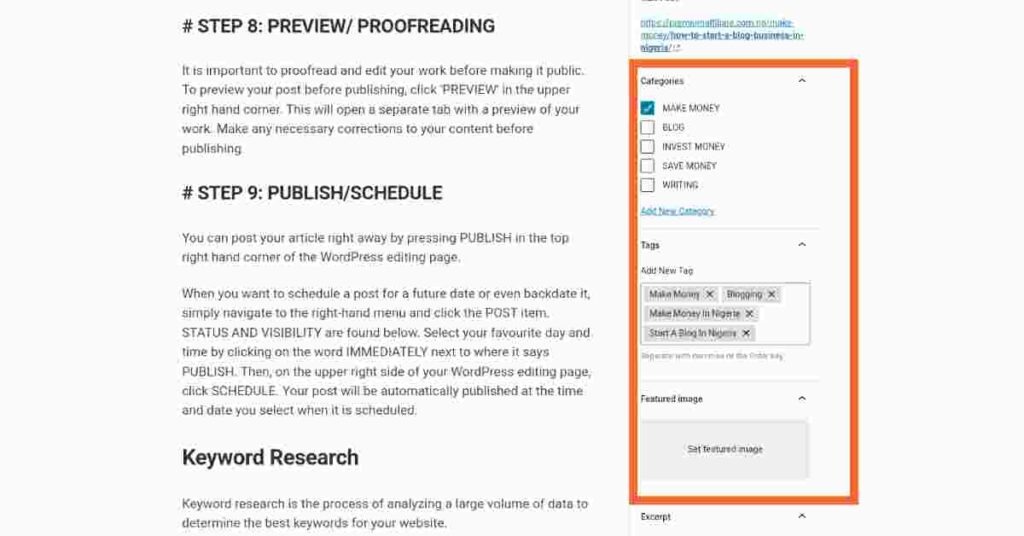
# STEP 7: ADDING CATEGORIES, TAGS, FEATURED IMAGE AND
Choose the POST option from the drop-down menu on the right.
You can now head to the CATEGORIES section and select the category for your blog post. Then, you can enter your tags in the TAGS section. To finish up, click on SET FEATURED IMAGE and select or upload an image. Finally, copy and paste your first paragraph into the EXCERPT box (or write a custom excerpt if you fancy).
# STEP 8: PREVIEW/ PROOFREADING
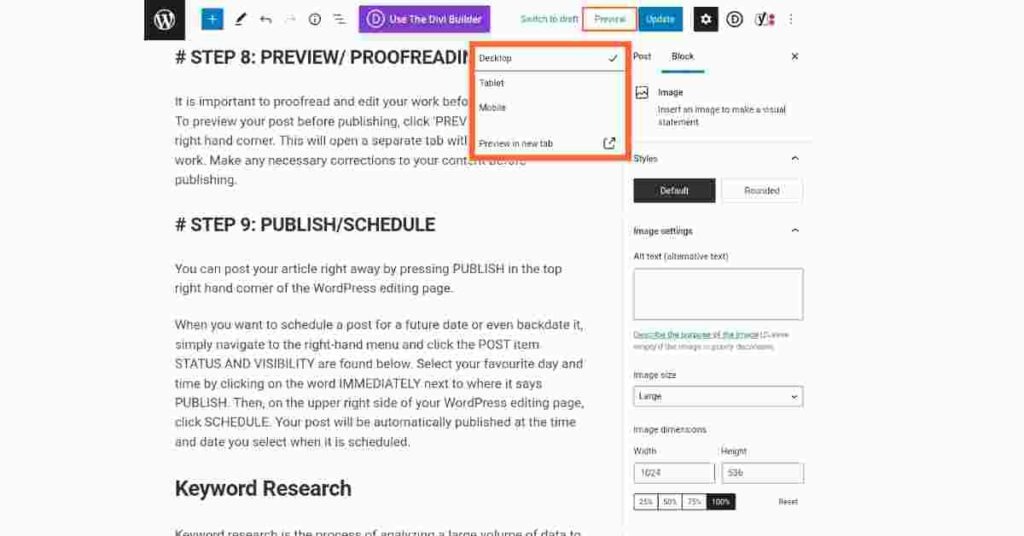
It is important to proofread and edit your work before making it public. To preview your post before publishing, click ‘PREVIEW’ in the upper right hand corner. This will open a separate tab with a preview of your work. Make any necessary corrections to your content before publishing.
# STEP 9: PUBLISH/SCHEDULE
You can post your article right away by pressing PUBLISH in the top right hand corner of the WordPress editing page.
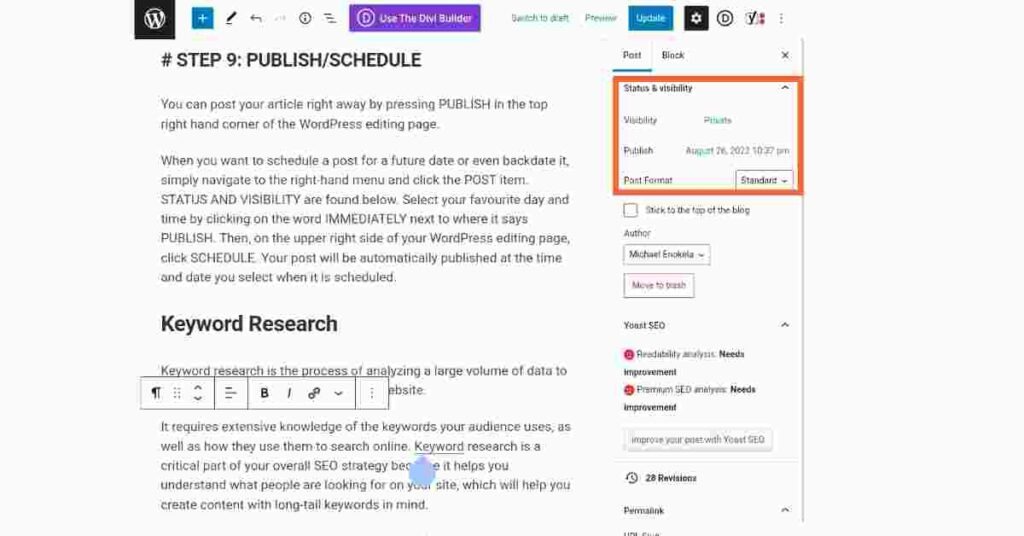
When you want to schedule a post for a future date or even backdate it, simply navigate to the right-hand menu and click the POST item. STATUS AND VISIBILITY are found below. Select your favourite day and time by clicking on the word IMMEDIATELY next to where it says PUBLISH. Then, on the upper right side of your WordPress editing page, click SCHEDULE. Your post will be automatically published at the time and date you select when it is scheduled.
Keyword Research
Keyword research is the process of analyzing a large volume of data to determine the best keywords for your website.
It requires extensive knowledge of the keywords your audience uses, as well as how they use them to search online. Keyword research is a critical part of your overall SEO strategy because it helps you understand what people are looking for on your site, which will help you create content with long-tail keywords in mind.
Before writing any block post, you need to perform keyword research. For example if you’re a blogger whose niche is SEO, you can easily find some keywords that are related to your niche like “SEO Tools” and then find out what search volume is there for each of them.
There are a lot of different keyword research tools out there, but not all of them are free. If you’re on a budget, you may be wondering which keyword research tool is the best to use without spending a lot of money.
7 Free Keyword Research Tools That Will Help You Rank Higher In search engines.
Here are some free keyword research tools to get you on your way:
Google Keyword Planner: This Keyword Planner lets you see how often people are searching for certain keywords and it also provides data on the competition level for those keywords. You can use this data to find low-competition keywords that you can rank for easily.
Keyword Tool: is a free online keyword research tool that helps you find the keywords that people are searching for on Google. Just enter in a seed keyword, and the tool will generate a list of related keywords.
Soovle: is another free keyword research tool that’s similar to Keyword Tool. Just enter in a seed keyword, and the tool will generate a list of related keywords.
Answer the Public: is a free tool that helps you find the questions that people are asking about a given topic. Just enter in your keyword and it will generate a list of long tail keywords you can target or include in your post.
Google Trends: is a great way to see which keywords are currently trending. You can use it to find popular topics to write about, as well as to see what keywords are being searched for the most.
Semscoop: is another great free keyword research tool. It allows you to see which keywords are being used by your competitors, as well as to find new keywords to target.
Keywordio: is a great tool for finding long-tail keywords. Long-tail keywords are great because they tend to be less competitive and easier to rank for.
Moz: is another great option for free keyword research. They have a tool called Keyword Explorer that allows you to see monthly search volume, keyword difficulty, and more.
Keyword Everywhere: is a browser extension that shows you monthly search volume and CPC for any keyword you enter into a search engine.
The Hoth: This tool is great for quickly generating a list of relevant keywords for your business. Simply enter in a seed keyword and The Hoth will return a list of related keywords, sorted by relevance. It will also show you competition search volume and more.
After performing keyword research, you need to start brainstorming ideas for content that can be written on the keywords you have researched.
Here is a video showing you how you can find low competitive high search volume keywords for your blog.
Here are some tips on how to perform keyword research:
1. Find The Right Keywords For Your Site:
This is the most important thing you can do. You should analyze your website and see what kind of topics and keywords people use on your website. If you want more traffic, you need to find the right keywords for your website.
2. Find Competitors:
Find out who are the competitors of your blog site so that you can analyze their ranking and see which keywords they are ranking for and how much traffic they are getting from them.
3. Analyze Results:
After finding out what keywords are ranking high for competition sites and their traffic, analyze those keywords with Google Trends tool so that you can understand their popularity trends over time and if they are gaining or losing popularity over time.
5.find Keyword Search Volume:
This will help you determine the number of times a certain keyword has been searched per month in Google and Bing. For example, if there are 10,000 searches per month for the term “SEO Tools”, then it would be a good idea to make this your main focus as it would provide more traffic compared to other keywords that may be less popular but still relevant to your business. During your keyword research, you should focus more on finding keyword ideas with low competition and high search volume.
4.Examine Top Keywords:
Analyze your top search terms, check whether there are any keywords which have not been targeted yet by competitors. By analysing your top 10 keywords, you can identify new niches which can be explored by your website. This will help you in creating content which will attract readers towards your website and ultimately increase visits on it.
Coming Up With Content Ideas For Your Blog
If you’re struggling to come up with ideas for your blog, don’t worry – you’re not alone. It can be tough to think of topics that will be both interesting and relevant to your audience. But never fear – there are a few strategies you can use to generate ideas for your blog posts.
One approach is to think about the questions your customers or clients are always asking you. You can use your blog to answer these questions and help your customers learn more about your industry or your products. Another approach is to keep up with industry news and write about the latest trends in your field. You can also use your blog to share company news, such as new products or partnerships.
No matter what approach you take, remember that your goal is to produce content that is interesting and helpful to your audience. If you can do that, you’ll find that readers will continue reading it on a regular basis because they like what’s being published on their site!
If you are having difficulty coming up with content ideas for your blog, you can outsource the process. There are many writers and content creators who are willing to help you with your blog. They will write articles on any topic that you want them to write about.
We recommend using HIREWRITER.COM. They offer one of the cheapest writing services you can see online.
But if you want to write on your own and have no ideas of how to get started. You can invest your time in using a content writing AI tool. We recommend using Simplified.
It’s an all in one digital marketing tool for writers, graphic designers, video makers and social media managers. It’s a free tool that allows you to create quality content without having any content writing skills. It’s perfect for beginners who want to start creating content without investing too much time and money.
How To Grow You Website (Blog) Traffic
After creating content on your blog, the next step is to drive traffic into it.
There are many ways to do this, and it’s important to choose the method that works best for you. The following methods can be used to increase your website traffic:
Writing Quality Content
One of the best ways to boost traffic to your blog is to write quality content that is informative and interesting. By writing content that is truly worth reading, you will attract more visitors to your site and keep them coming back for more.
Of course, writing quality content is not always easy. It takes time and effort to research and write articles that are truly worth reading. But if you can put in the work, you will be rewarded with increased traffic and a loyal audience. So if you’re looking for ways to boost your blog traffic, start by writing quality content.
Regularly Posting New Content
If you’re looking for ways to increase your website traffic, you should know that one of the best things you can do is to post regularly. When you post new content on your website, it gives people a reason to come back to your site. And if you keep your posts fresh and interesting, you’ll find that more and more people will want to visit your site on a regular basis.
Of course, posting regularly isn’t the only thing you can do to increase your website traffic. But it’s a good place to start, and it’s something that you can easily do on a consistent basis. So if you’re looking for ways to get more people to visit your site, start by posting new content on a regular basis.
Make Your Website Load Faster
No one likes a slow website. A fast website is essential for a successful blog. A slow loading website will likely cause visitors to leave before they can view your content. This not only hurts your chances of engaging with potential readers, it can also hurt your search engine ranking. Fortunately, there are a few simple things you can do to speed up your website and improve your blog’s traffic.
First, make sure you’re using a good quality hosting service. A good host will have a positive impact on your website’s speed. Second, optimize your images before you upload them to your website. Large files can slow down your website, so it’s important to make sure your images are as small as possible without sacrificing quality. Finally, avoid using too many plugins or scripts on your website. While they can be helpful, too many can slow down your website.
Invest In Paid Advertisement
There are a number of ways to increase traffic to your blog, and one method that can be particularly effective is paid advertising. Paid advertising allows you to reach a wider audience with your content and can help to bring in new readers who may not have otherwise found your blog.
If you’re looking to give paid advertising a try, there are a few things you should keep in mind. First, you’ll need to choose the right platform for your ads. There are a number of different options out there, so do some research to find the one that best suits your needs. Once you’ve selected a platform, you’ll need to create your ad campaign. This will involve developing creative content that will grab attention and get people to click through to your blog.
Create Posts That Are Evergreen
Evergreen content is defined as content that remains relevant and useful over time. It is the opposite of timely content, which is only relevant for a short period of time.
Some examples of evergreen content include how-to articles, listicles, and resource guides. This type of content is ageless and can continue to generate website traffic long after it is published.
If you want to create content that will help boost your website traffic for years to come, consider creating evergreen content.
Email Marketing
Email marketing is a great way to boost your website traffic. You can use it to build relationships with your customers and prospects, generate leads, and drive sales. Additionally, you’ll continue to be on your audience’s minds.
To get started with email marketing, there are a few steps to take. To begin with, you will need a list of subscribers. You can do this by offering something of value in exchange for an email address, such as a free e-book or white paper. Once you have a list of subscribers, you need to create email campaigns that are relevant to their interests. You can do this by segmenting your list and sending targeted emails. Finally, you need to measure your results so you can optimize your campaigns and continue to grow your website traffic.
Build Strong Backlinks
In order to build strong backlinks, you must first understand what a backlink is and how it works. The term backlink simply refers to a link from one website to another. When someone clicks on this link, they will be directed to the second website. The purpose of backlinks is to help improve a website’s search engine ranking. The higher the number of backlinks a website has, the better it will rank in search results.
Building backlinks can be a time-consuming process, but it’s worth it if you want to boost your website’s traffic. There are a few different ways to build backlinks, such as guest posting, directory submission, and blog commenting. You can also try to get backlinks from high-quality websites, such as .edu and .gov websites.
There are plenty of websites out there where you can build backlinks from. But which ones are the best? Here’s a quick rundown of some of the best websites to get backlinks from:
– Wikipedia: One of the most popular and well-known website on the internet. If you can get a link from Wikipedia, it’ll definitely give your website a boost.
– Reddit: A huge and popular website with a ton of different niches and communities. If you can get involved in one of the communities and post relevant content, you can definitely get some backlinks.
– Quora: A Q&A website where people can ask questions and get answers from experts. If you can provide helpful answers to questions, you can build up a reputation and get some backlinks.
– Tumblr: Tumblr is a great platform for sharing visual content. If you have infographics or other visuals to share, Tumblr is a great place to do it.
– HubPages: A website where you can create articles, and then other users can comment on your articles. If you have a website, you can add a link to your website in your article.
-Medium: A website where you can write articles and share them with the world. You can also add links to your website in your articles.
Most of this website allows you to post content you have written on your blog directly to their website. Because of this, you don’t have to be concerned about duplicate content.
Write A Guest Post
Another way you can increase your website traffic is by writing guest posts for other blogs and websites. When done correctly, guest posting can be an extremely effective way to reach new audiences and promote your website.
It is crucial to realize, however, that not all guest articles are equal. In order to get the most out of your guest posts, you need to make sure that they are well-written, informative, and relevant to your target audience. Additionally, they should be published on high-quality websites that are relevant to your niche.
If you’re looking to boost website traffic through guest posting, follow these tips to ensure that your posts are effective:
– Write quality content that is well-researched and informative
– Find reputable websites that are reputable to your niche
– Make sure your guest posts are published on sites with large audiences (over 100K) who will benefit from the information you provide
– Edit your content until it meets a professional standard before submitting it as a guest post.
Host Guest Post
You can also host guest posts from other bloggers in your industry. This is a great way to get new eyes on your site, as well as build relationships with other bloggers.
If you are not sure where to start, have a look at these tips. First, reach out to bloggers you know and see if they’re interested in writing a guest post for your site. If they are, great! If not, don’t worry – there are plenty of other bloggers out there who would be happy to contribute.
Once you’ve found a few potential guest posters, offer them a few guidelines on what you’re looking for. For example, you might want a post that’s around 500 words, on a specific topic, and with 1-2 links back to the blogger’s own site. Once you’ve got those details worked out in mind (and hopefully committed), reach out again and ask if they’d like to work with you! It’s important not only because it will help boost your blog traffic but also because it shows potential readers that you’re serious about building relationships with other writers in the industry.
Promote Your Blog Post On Social Media
Social media is another powerful way to get your post in front of people. It’s a great way to get traffic, and it can be used as a tool for promoting your blog posts, too.
Social media is like the “world’s largest, most active audience.” It’s where people go to connect and engage with other people. There are many different platforms like Facebook, Twitter, Radit and Instagram but they all have their own pros and cons. In order to gain the most exposure on social media you’ll need to do some research first and find out which platform works best for your niche.
Once you’ve decided which platform is right for you then it’s time to start posting! Here are some tips that will help promote your blog:
-Post regularly using keywords related to your content so others can find it easily.
-Share interesting articles that fit into your niche topic or topic of interest so others can learn something new from them.
-Scheduling you post. Posting too often can turn people off. Don’t post more than twice a week and make sure that you don’t post irrelevant content.
-Use hashtags when possible so your posts are seen by the right people. You can also use emojis and smileys to add personality to your posts.
-If someone comments on one of your posts, respond quickly with something witty or informative. This shows that you care about what they have to say and will help build trust between yourself and your followers.
Index Your Website Across Major Search
If you want people to find your website, you need to make sure it’s properly indexed by major search engines. Search engine indexing is the process of a search engine crawling through your website and adding your pages to their database. This is how your pages show up in search results.
There are a few things you can do to make sure your website is properly indexed. First, you need to create high-quality content that includes the keywords people are likely to use when searching for your products or services. You also need to make sure your website is well-organized and easy to navigate. Finally, you need to submit your website to major search engines like Google, Yahoo, and Bing.
Make Your Blog Mobile Friendly
Making your blog mobile friendly is essential if you want to boost website traffic. In 2018, Google announced that its algorithm would start to favor mobile-friendly websites over those that are not optimized for mobile. This means that if your website is not mobile friendly, it is likely that you will see a drop in website traffic.
There are a few things you can do to make sure your website is mobile friendly. First, make sure your website is responsive, meaning it will adjust to fit any screen size. Second, use large fonts and buttons so that people can easily tap on them with their fingers. Third, avoid using Flash or other technologies that are not supported on mobile devices. By following these tips, you can make sure your website is accessible to the widest audience possible.
You can find more on how to boost website traffic here
How You Can Make Money From Your Blog In Nigeria ?
You may not make any money when you first start monetizing your blog. This is normal and expected. You must be diligent and committed. With perseverance, your earning potential will improve.
There are numerous ways to monetize your blog in Nigeria. You can sell advertising space, offer paid subscriptions, or even sell products and services through your blog. The best way to monetize your blog will depend on your particular niche and audience.
Here are some ways to start monetizing your blog in Nigeria:
#1 Google AdSense
Google AdSense is a program that allows you to place ads on your website or blog and earn money each time someone views or clicks on an ad. The ads are provided by Google and are usually relevant to the content on your website or blog. AdSense is a great way to monetize your blog because it’s an easy way to earn money without having to sell anything or provide any services.
If you’re interested in monetizing your blog with Google AdSense, there are a few things you need to do. First, you need to sign up for a Google AdSense account. Once you have an account, you can then connect your website to your new AdSense account. After which you need to apply for monetization. If your website meets the requirements, you will be able to display ads on your website or blog. Google will provide you with a variety of ad formats and sizes to choose from, so you can customize the ads to fit your website or blog.
#2 Affiliate Marketing
One of the most common ways bloggers monetize a blog is with affiliate marketing. Affiliate marketing is a type of business module in which an affiliate is rewarded for each visitor or customer brought to the site by the affiliate’s own marketing efforts.
As a blog owner, you can sign up for affiliate programs with companies that sell products or services related to your blog’s niche. Then, you can include affiliate links in your blog posts and earn a commission whenever a reader clicks on the link and makes a purchase.
If you’re thinking about monetizing your blog with affiliate marketing, there are a few things you should keep in mind. First, you need to make sure that your blog is getting enough traffic to generate sales. And second, you need to carefully select the affiliate programs you want to join to ensure that they fit with your blog’s theme.
There are various affiliate programs you can sign up for in Nigeria. Some of these programs include:
– The Amazon Associates Program
– The Awin affiliate program
– The Rakuten affiliate program
– JVZoo
– ShareASale
– Spocket Affiliate Program
– Expertnaire
Each of these programs has its own set of terms and conditions, so be sure to read them carefully before signing up. Once you’re signed up, you can start promoting products and earning commissions on sales.
#3 Sponsorship
Monetizing your blog with sponsorship is a great way to make money from your writing. But how do you go about finding sponsors for your blog?
The first step is to reach out to companies that you think would be a good fit for your blog. You can do this by either emailing them directly or by using a service like SponsoredReviews.com.
Once you’ve found a few companies that you think would be a good fit, it’s time to start pitching your ideas. You’ll want to create a media kit that outlines your blog’s traffic and demographics. This will help the companies see your blog’s value and give them an idea of what kind of sponsorship opportunities you have to offer.
#4 Sell Digital Products
Selling digital products is yet another way to monetize your blog. You can sell anything: e-books, e-courses, webinars, articles, and more. Digital products are easier to sell than physical products because they can be downloaded from anywhere in the world and are often cheaper than physical items. This is especially true of e-books, which can cost less than $5 each.
There are many ways you can sell digital products on your blog. You can link up with an affiliate program that will give you a percentage of the profit when someone buys one of those products through your link or You can also choose to create your own digital products and sell them. The earning potentials are limitless.
#5 Offer Exclusive Contents
As a blogger, you have the opportunity to monetize your blog in a number of different ways. One option is to offer exclusive content to your readers. This could be anything from premium articles to exclusive videos or audio content.
If you have high-quality content that your readers can’t get anywhere else, they may be willing to pay for it. This is a great way to monetize your blog and keep your readers coming back for more.
Of course, you’ll need to balance exclusivity with making sure your content is still accessible to a wider audience. You don’t want to alienate your readership by making all of your content paywalled. But offering some premium content can be a great way to generate income from your blog.
Wrap up
In conclusion, if you’re looking to start a blog business that makes money in Nigeria, there are a few tips you should follow to ensure success. First, it’s important to choose a profitable niche.
Next, you need to create content that is high quality and informative. Lastly, you must promote your blog through social media and other channels.
If you follow these tips, you’ll be on your way to starting a successful blog business in Nigeria.
FAQ
Is Blogging A Lucrative Business In Nigeria?
There is no simple answer to this question. It depends on a variety of factors, such as the niche you choose to blog about, your target audience, your marketing strategy, and more.
That being said, blogging can be a very lucrative business in Nigeria if you find the right niche and put in the effort to grow your blog. There are many bloggers in Nigeria who are earning a full-time income from their blog, and some who are even making over $100,000 per month.
If you’re serious about making money from blogging, it’s important to do your research and find a niche that is profitable. Once you’ve found a niche, you need to work hard to grow your blog and build an audience. If you can do this, then you can start earning a good income from blogging.
How Much Can I Make Blogging In Nigeria?
This is a difficult question to answer because it depends on a lot of factors, such as the niche you blog about, the quality of your content, your marketing strategy, and more. However, we can give you a rough estimate of how much you can make blogging in Nigeria.
If you’re able to grow your blog to a large audience and generate a significant amount of traffic, you could potentially make thousands of dollars per month from advertising and other monetization strategies. Of course, this is just a rough estimate – the sky is the limit when it comes to blogging. With hard work and dedication, you could easily make blogging in Nigeria a very lucrative career.
How Much Does It Cost To Start A Blog In Nigeria?
There’s no set amount of money you need to start a blog in Nigeria. However, you will need to invest some time and effort into setting up your blog and promoting it. You may also want to consider hiring a freelance writer or paying for some blogging courses to help you get started.
With that said, let’s take a look at some of the costs you may need to consider when starting a blog in Nigeria:
– Domain name: You can expect to pay around $10 per year for a domain name.
– Hosting: Depending on the type of hosting you choose, you could spend anywhere from $2.99 with Hostinger.
– Theme: If you decide to purchase a premium theme for your blog, you could spend anywhere from $30 to $100. But you can start with free themes and grow your way to paid themes if you are saving money.
-Writing: Paying a freelancer to write for you can cost you anywhere from $10 to hundreds of dollars, of which you are charged based on the number of words. If you decide to use a writing AI tool, although some of them have a free plan which offers you anywhere from 1000 to 2000 words per month. The paid plans have more function and unlimited usage which can cost anywhere from $9 to $75 per month (The pricing stated here is for Simplified. Check Pricing for other tools).
Generally speaking, you can expect to spend a few thousand naira to start a blog in Nigeria. But if you want to be successful, you’ll need to be willing to invest time and effort into your new venture.
Can I Start A Blog With Just My Phone?
The short answer is yes – you can start a blog with just your phone. In fact, there are a number of different blogging platforms that are designed specifically for mobile users. Before you begin, there are a few points to bear in mind.
For one, it’s important to choose a platform that is mobile-friendly and easy to use. You’ll also want to make sure that you have a good understanding of how to use the platform before you get started. And lastly, it’s important to remember that starting a blog on your phone is not going to be as simple as starting a blog on your computer. There are a few extra steps involved, but it’s definitely doable. The current blog post you are reading was written with a phone.
How Fast Can I Make Money Blogging In Nigeria?
Here’s the thing: there’s no ‘get rich quick’ scheme when it comes to blogging. It takes time, effort and a lot of consistency to build a successful blog. However, if you’re in it for the long haul and you’re willing to put in the work, blogging can be a great way to make money.
So, how fast can you make money blogging in Nigeria? It depends. If you’re just starting out, it’s unlikely you’ll make much money in the first few months (or even years). But if you stick with it and you’re able to grow your blog and your audience, you can start to see some serious earnings.
Of course, the amount of money you make will also depend on how you monetize your blog.
How Do I Become A Successful Blogger In Nigeria?
Here are a few tips on how to be a successful blogger in Nigeria:
– Choose a niche that you’re passionate about. This will make your blogging more enjoyable and will also make it easier to attract readers who are interested in your topic.
– Write informative and engaging content. This is the key to keeping readers coming back for more.
– Use social media to promote your blog. This is a great way to reach new readers and grow your audience.
– Be patient. Growing a successful blog takes time, so don’t get discouraged if you don’t see immediate results.